Climbing Wall Plywood and T-Nuts: What to Buy, How Many and How to Install Them
 Petr Hess, strength & conditioning coach
Updated 2 Nov 2026 · 12 min read
Key takeaways
Best for: DIY builders choosing plywood and T-nuts for a home climbing wall
- Use 3/4 in. (US) or 18 mm (EU) plywood with a sound face; birch multiplex is the board-maker standard, and OSB loosens T-nuts as it swells.
- Pick one thread for the whole wall: 3/8-16 in the US, M10 in Europe. They are not interchangeable.
- An 8 in. (20 cm) grid gives 72 T-nuts per 4 x 8 ft sheet, a 6 in. grid 128; plan it against your framing before drilling.
- Screw-in 2-hole T-nuts spin far less than 4-prong ones; buy the T-nuts first and match the drill bit to them.
For a climbing wall, use 3/4 in. (US) or 18 mm (EU) plywood with a sound, smooth face: sanded AC/ACX or cabinet-grade in the US, birch multiplex (Birke Multiplex) in Europe. Fit it with 3/8-16 or M10 T-nuts on a regular grid, usually 72 to 128 per 4 x 8 ft sheet. Screw-in (2-hole) T-nuts cost a little more than 4-prong ones but spin far less, and that matters more than anything else in this list.
This guide is about materials: which sheet to buy, which T-nut, how many, and how to fit and finish them. For the frame, angle and full build sequence, see our guide on how to build a home climbing wall. I'm a strength and conditioning coach, not a carpenter or engineer. The specs below come from hold and board makers and experienced wall builders, linked in the sources.
Prices and stock change often; the button opens the retailer or brand page so you can check today's price.
Climbing wall plywood: what to buy
Every source we read agrees on the thickness. Treeline Review calls 3/4 in. sheeting the thinnest, lightest and cheapest option that is still strong enough, and notes that hold makers base their T-nut and bolt lengths on it. Moon Climbing's official MoonBoard kickboards are 18 mm birch plywood, and the panels come pre-drilled for M10 T-nuts with a hard-wearing PU coating.
Thickness is the easy part. The quality of the face and core matters more than most first-time builders expect:
- Knots and voids weaken T-nut holes. Treeline warns that large knots or voids raise the risk of a bolt anchor tearing through. IndoorClimbing.com points out that plywood can have soft spots where a knot removes a ply. Look along the edges of each sheet before you buy: fewer gaps in the inner plies is a good sign.
- A smooth face is enough. You don't need furniture-grade veneer, but a sanded face without large patches makes painting easier and lets holds sit flat. A hold that doesn't sit flat is a hold that spins.
- Birch is the board-maker standard. Baltic birch plywood has a near void-free core made entirely of cross-banded birch plies. It costs more than construction plywood, but there are no hidden gaps for a T-nut to tear into.
Why not OSB?
OSB is cheaper, but IndoorClimbing.com, Treeline and builders on Mountain Project all advise against it. IndoorClimbing.com's comparison explains why: OSB holds more moisture and swells more, and the swelling is worst at cut edges, which includes every T-nut hole. That loosens T-nuts and creates spinners. OSB is also about 15% heavier, flexes more and tends to crack texture at panel joints. Its author has seen T-nuts pull through old plywood walls and expects it to happen more often in ageing OSB.
None of the build guides we read used MDF or chipboard (Spanplatte) for the climbing surface, and we wouldn't either.
US and EU plywood equivalents
Plywood is graded differently on each side of the Atlantic, which confuses people following US build videos in Europe (and the other way round). This table matches the common choices.
| Job | US (imperial) | Europe (metric) | Notes |
|---|---|---|---|
Indoor climbing surface, good | 3/4 in. sanded AC, ACX or BC plywood | 18 mm Multiplex (birch, poplar or mixed), EN 636-1 or EN 636-2 | First letter is the face grade. A face of A or B gives a smoother surface |
Indoor climbing surface, best | 3/4 in. (or 18 mm) Baltic birch or cabinet-grade birch | 18 mm Birke Multiplex, B/BB or BB/BB face | What MoonBoard kickboards use; the most even core |
Outdoor or damp garage | 3/4 in. plywood with an Exterior bond rating, sealed and painted | 18 mm EN 636-3 plywood or film-faced Siebdruckplatte | APA says Exposure 1 panels (e.g. CDX) aren't for permanent outdoor use |
Marine environments | BS 1088 marine plywood | BS 1088 marine plywood | More than a home wall needs |
Avoid | OSB, CDX with big voids, particleboard | OSB, Spanplatte, MDF | Swell, crumble or hold T-nuts poorly |
Standard sheet size | 4 x 8 ft (1220 x 2440 mm) | 1220 x 2440 mm or 1200 x 2400 mm; Baltic birch often about 1500 x 1500 mm (5 x 5 ft) | Plan your T-nut grid around the sheet you can actually buy |
A few notes on the grade codes:
- US letters. APA grades veneers from A (best appearance) to D, and a panel grade like "B-C" means a B face and C back. C is the lowest veneer allowed on Exterior panels. The bond classification ("Exterior" or "Exposure 1") is about glue and weather, not strength.
- EU classes. EN 636-1 is for dry conditions, EN 636-2 for humid conditions and EN 636-3 for exterior use. In German, "Multiplex" means plywood over 12 mm thick with at least five plies, so an 18 mm Multiplexplatte is the usual search term.
- Siebdruckplatte is phenolic film-faced plywood with a mesh-patterned surface, made for concrete formwork and transport floors. Because it is built for wet formwork, it's worth considering for an outdoor or garden wall. We couldn't find a hold or board maker that compares it with birch for climbing, so for an indoor wall, plain birch multiplex is the safer default.
Plywood is a local purchase. Big sheets are heavy (MoonBoard's six main panels and two kickboards weigh 119 kg in total), and they cost a lot to ship. A timber merchant (Holzhandel, almacén de maderas, négoce de bois) is often the best place to find birch grades, and many will cut sheets to size.
Climbing wall T-nuts: thread, type and drill size
A T-nut is a threaded sleeve with a flange. It sits in a hole from the back of the panel so a bolt through a hold can thread into it. You need to choose three things: the thread, the type and the hole size.
M10 vs 3/8-16
Climbing holds use one of two bolt standards:
- 3/8-16 (3/8 in. diameter, 16 threads per inch): the standard in the US and on most US-made holds.
- M10 (10 mm, standard coarse pitch): the standard in the UK and Europe, and on MoonBoard panels.
They are close in size, but the threads are not interchangeable. Forcing the wrong bolt in will strip the T-nut, the bolt or both. Pick one standard for the whole wall. In Europe, M10 bolts and T-nuts are easier to buy locally (search "Einschlagmutter M10" in German shops); in the US, 3/8-16 is everywhere. Moon sells its MoonBoard T-nut kit in both US Standard and Metric versions.
T-nut types compared
| Type | How it holds | Pros | Cons | Best for |
|---|---|---|---|---|
4-prong (standard, Einschlagmutter) | Prongs hammered into the back of the plywood | Cheapest, quick to fit, sold everywhere | Most likely to spin or push out when a hold is tightened or a bolt cross-threads | Budget walls, low-traffic panels, kids walls |
2-hole screw-in ("commercial") | Flange screwed to the panel with two small wood screws | Resists spinning and pop-out; easy to replace | A bit more per unit; one extra step per T-nut | Most home training walls and boards |
Pre-installed (board panels) | Fitted by the board maker | Hole positions match the app exactly; no drilling | By far the most expensive way to get T-nuts | MoonBoard, Kilter and other standard boards |
Moon's metric MoonBoard T-nuts are a good example of the screw-in type. Moon says each needs two small mounting screws to stop it spinning or falling out of the back of the panel, with screws no thicker than 3.5 mm and no longer than 16 mm, so they don't poke through an 18 mm panel. Moon sells them in packs of 50 and says a full MoonBoard needs 210.
Drill size: always check the T-nut you bought
The barrel diameter differs between makers, so the hole does too. IndoorClimbing.com uses a 7/16 in. (11.1 mm) bit for standard 3/8 in. pronged T-nuts. Moon's metric T-nuts need a 13 mm hole. Treeline's authors used the wrong bit on every hole and had to go back and redrill. Measure the barrel of one T-nut with calipers, or read the maker's spec, before you drill hundreds of holes.
A brad-point or Forstner bit of the right size cuts cleaner holes in plywood than a standard twist bit, and leaves less tear-out on the face. For the drill itself, see our guide to the best drill for a climbing wall, and for the full kit list, the tools you need to build a climbing wall.
How many T-nuts per sheet? Grid spacing
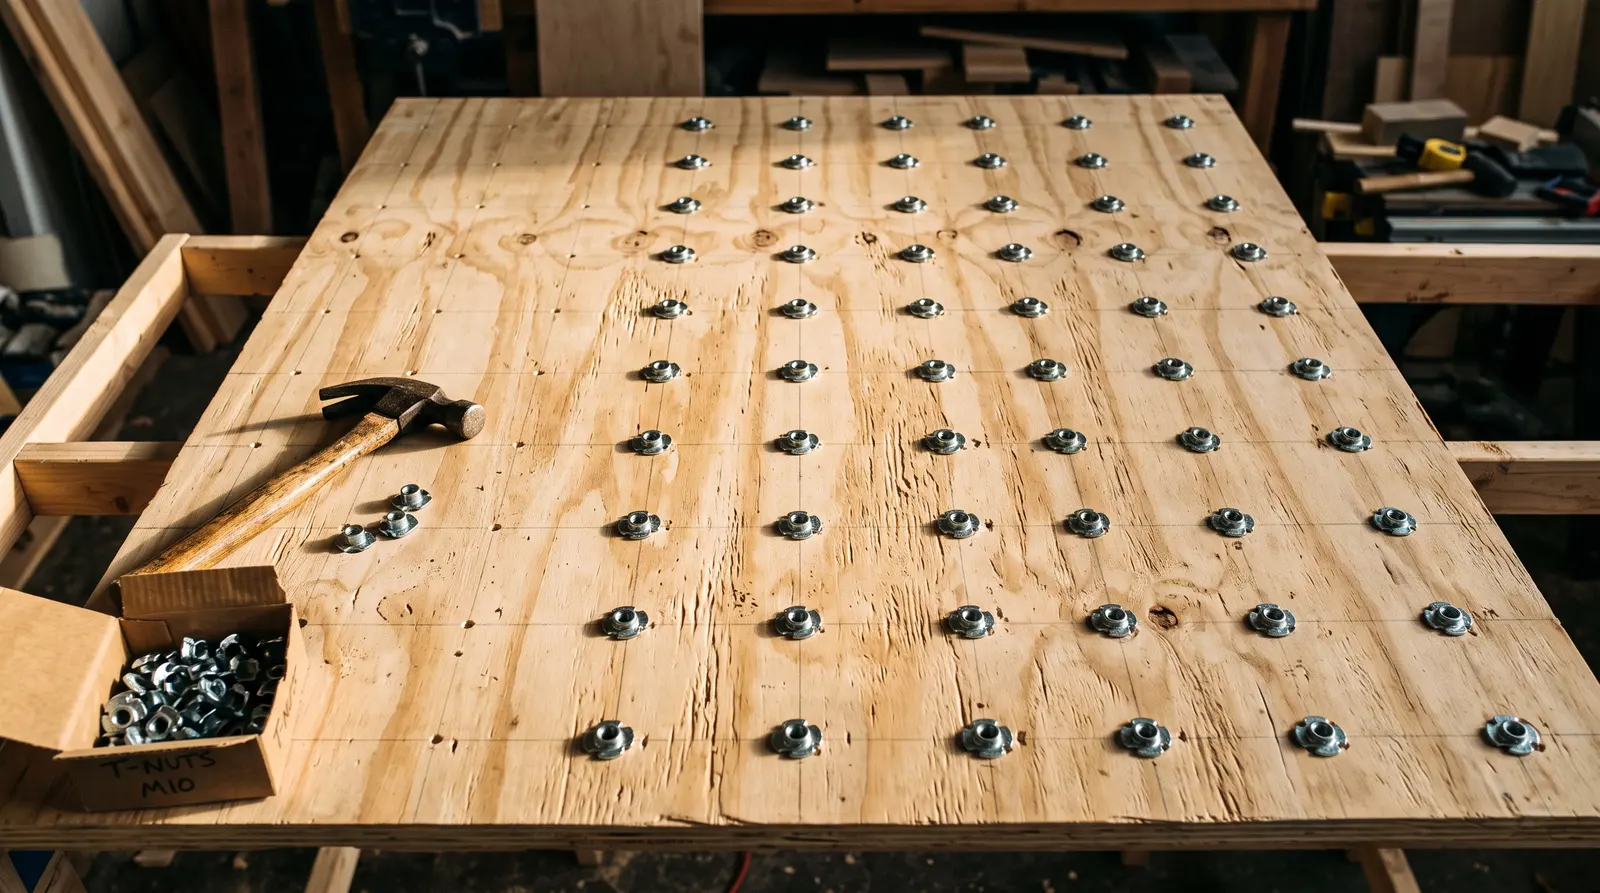
The number of T-nuts depends on your grid. IndoorClimbing.com's classic layout puts holes every 8 in., starting 4 in. from the edges. That gives 72 holes per 4 x 8 sheet and keeps every hole clear of framing at 16 in. or 24 in. stud spacing, which is the hardest part of the layout to get right.
| Grid spacing | Start from edge | T-nuts per 4 x 8 ft sheet | Per m² (approx.) | Who it suits |
|---|---|---|---|---|
8 in. (about 20 cm) | 4 in. (10 cm) | 72 | 24 | First walls, kids walls, budget builds |
6 in. (about 15 cm) | 3 in. (7.5 cm) | 128 | 43 | Most training walls |
4 in. (about 10 cm) | 2 in. (5 cm) | 288 | 97 | Dense spray walls; lots of drilling |
The counts are simple arithmetic: on a 48 x 96 in. sheet, an 8 in. grid starting 4 in. in gives 6 columns and 12 rows. On a 1220 x 2440 mm sheet, a 200 mm grid starting 100 mm in gives the same 6 x 12.
Which should you pick? Builders on Mountain Project disagree, which tells you there is no single right answer. One experienced builder there favours a 4 x 8 in. grid with every other row offset by 4 in., starting 2 in. from the panel edges. That gives roughly 6 in. diagonal spacing, works with 16 in. stud spacing and comes to about 200 T-nuts per 4 x 8 sheet. A sensible middle ground:
- Vertical or kids wall: 8 in. grid. Big holds don't need dense spacing.
- Steep training wall: 6 in. grid, or 8 in. with offset rows. Small holds on steep walls need more choice of position.
- Spray wall: as dense as your budget and patience allow, because you set by filling the wall.
- Standard board (MoonBoard, Kilter, Tension): don't invent a grid. The app problems only work if every hole matches the official layout. Moon sells pre-drilled, T-nutted panels, and Kilter's panels come with hold positions pre-marked and T-nuts installed.
Always lay out the grid on paper over your framing plan first. A T-nut that lands on a stud is a wasted hole.
How to install T-nuts, step by step
This sequence follows IndoorClimbing.com's method, with the screw-in step from Moon's T-nut instructions. Wear eye protection and hearing protection, and a dust mask while drilling and sanding.
- Cut the panels first. Cut each panel to final size before you drill. Drilling before cutting wastes T-nuts on offcuts and puts holes on your cut lines.
- Mark the grid on the face. Snap chalk lines or use a straight edge, starting from your chosen edge distance. Check that no hole lands on a framing line.
- Drill from the climbing face. Drill straight and square, face up, so splinters exit at the back. IndoorClimbing.com stacks two to four sheets on sawhorses to drill them together; if you do, clamp them so they can't shift.
- Clean up the back. Knock off splinters around each hole so the T-nut flange can sit flat.
- Turn the panel face down. T-nuts always go in from the back.
- Seat each T-nut square. Start it by hand, then give it a couple of solid, square hammer blows until the flange sits flush. If it goes in at an angle, pull it out and redo it. IndoorClimbing.com's warning is worth repeating: a badly seated T-nut is much harder to fix later than to fit right the first time.
- Fit the screws (screw-in types). Drive the small screws through the flange holes. Use screws short enough not to come through the face; Moon's limit is 16 mm for its 18 mm panels.
- Test before mounting. Run a bolt into a sample of T-nuts, especially any near knots or edges. A bolt should start by hand without cross-threading.
- Finish, then mount. Seal or paint the panel now, plugging the holes (see below), then mount it on the frame.
Do all of this before the panels go up. IndoorClimbing.com points out that hammering T-nuts into a mounted, overhanging wall is hard and stresses the frame joints.
Spinning T-nuts: prevention and fixes
A "spinner" is a T-nut that turns with the bolt, so you can't tighten or remove the hold. It's the most common home wall headache.
Why they spin: the twisting force from a hold that turns bends the T-nut's teeth and gouges the wood around the hole. Holds that don't sit flat, crooked T-nuts, damp or swelling wood and pronged T-nuts in soft plywood all make it more likely.
Prevention:
- Use screw-in T-nuts, or add screws to pronged ones that have holes.
- Seat every T-nut square and flush.
- Use set screws: many holds have a small hole for a screw that stops the hold rotating, which takes the twisting load off the T-nut.
- Don't over-tighten holds. Firm is enough.
- Keep the wood dry. IndoorClimbing.com warns that wood which isn't dry can make holds loosen and spin.
Fixing a spinner:
- Before you go behind the wall, push something through the hole from the front (a long bolt or a dowel) so you can find it.
- If the wood is sound, put wood glue in the hole and reseat the T-nut.
- Pull it tight with an installer: IndoorClimbing.com's is a length of 3/8 in. threaded rod with two nuts locked together and a washer. Clamp it in a drill, thread it into the T-nut from the front, and draw the T-nut tight at slow speed. Use M10 rod for M10 T-nuts.
- Let the glue dry for a few hours before you bolt a hold on.
- If the wood is too torn up, abandon the hole and fit a new T-nut nearby. Don't keep pounding a T-nut into damaged wood.
All of these fixes need access to the back of the panel, so leave a way in if you can, or use screw-in T-nuts from the start.
Sealing, painting and texturing panels
You don't have to finish an indoor wall, but sealing or painting protects the plywood, makes it easier to clean and looks better. Do it after the T-nuts are in and before the panels go up. Treeline notes that some products take several days to dry fully, so plan around that.
- Plug the holes first. IndoorClimbing.com plugs every T-nut hole with golf tees and leaves them in until the finish has cured. It recommends unvarnished tees, because coated ones are slippery and can pop out. Paint or texture in the threads can stop bolts catching the T-nut.
- Prime, then paint. Prime new wood before latex or alkyd paint, and use a stain-blocking primer on old timber. IndoorClimbing.com prefers exterior latex for durability.
- Texture is optional. For a sand texture, IndoorClimbing.com mixes about 10 parts paint to 1 part sand by volume, rolls it on, and keeps remixing because the sand settles. Test on a scrap first. But many boards skip it: Kilter says its panels have no texture on purpose, because smooth panels are more durable, more consistent and kinder to shoes.
- Clear coat. A clear varnish or PU coat keeps the wood look. Moon's MoonBoard panels use a hard-wearing PU coating.
- Use rust-resistant hardware. Water-based paint can rust plain steel, so IndoorClimbing.com recommends galvanized screws and bolts.
Bolts: matching length to plywood
Bolts must match the T-nut thread. Most bolt-on holds use socket-head (Allen) bolts. Length depends on how deep the bolt hole in the hold is: the bolt has to go through the hold and the plywood and engage the full T-nut, without bottoming out on the back of the hold or hitting the frame behind. Check the hold maker's recommended bolt length for each hold or set. If you build with 18 mm or 3/4 in. plywood, standard hold bolts fit as intended; thinner or thicker panels change the length you need. For choosing holds themselves, see our guide to the best climbing holds for a home wall.
Common mistakes
- Buying the drill bit before the T-nuts. Hole size depends on the T-nut. Buy T-nuts first, measure, then buy the bit.
- Mixing M10 and 3/8-16. One standard per wall, with bolts to match.
- OSB or cheap sheathing with voids. Saves money now, costs you spinners and pull-outs later.
- Grid not planned against the framing. Holes that land on studs are useless.
- Drilling from the back. Splinters on the climbing face, flanges that don't sit flat at the back.
- Fitting T-nuts after the panels are mounted. Harder, slower and hard on the frame.
- Too-long screws on screw-in T-nuts. They poke through the face.
- Painting without plugging holes. Clogged threads and bolts that won't start.
- Glue near T-nut threads. Treeline warns that adhesive on the threads can make T-nuts unusable.
- No spare T-nuts. Buy a few spares for crooked seats and repairs.
Safety: what the materials can't fix
Good plywood and T-nuts make a strong climbing surface, but the risk on a home wall is usually in the structure and the landing. A steep wall is heavy before anyone climbs on it, and climbers add dynamic loads when they cut loose or fall. If the wall attaches to your house (ceiling joists, rafters, a garage beam or masonry), get a structural engineer or qualified builder to check the attachment and load path. We don't give load ratings here because we couldn't find any we could source for home builds.
Lift panels with at least two people, especially overhanging ones. Check holds and bolts regularly, and replace any T-nut that spins or sits proud. And put proper matting under the wall before the first climb, not after. For the rest of the build, go back to our home climbing wall build guide.
FAQ
What thickness of plywood do you need for a climbing wall?
Use 3/4 in. plywood in the US or 18 mm plywood in Europe. Hold makers base their T-nut and bolt lengths on this thickness, and MoonBoard kickboards are 18 mm birch plywood. Thinner sheets leave less wood around each T-nut, and OSB is a worse choice because it swells and loosens T-nuts over time.
How many T-nuts per 4 x 8 sheet of plywood?
An 8 in. (about 20 cm) grid starting 4 in. from the edges gives 72 T-nuts per 4 x 8 ft sheet. A 6 in. grid gives about 128 and a 4 in. grid about 288. Most home walls use 72 to 128 per sheet; denser grids give more setting options but cost more in hardware and drilling time.
Are M10 and 3/8 in. T-nuts interchangeable?
No. M10 and 3/8-16 are close in size and do the same job, but the threads are different, so an M10 bolt won't thread properly into a 3/8-16 T-nut or the other way round. Pick one standard for the whole wall, usually 3/8-16 in the US and M10 in Europe, and buy bolts to match.
How do you fix a spinning T-nut?
Mark the hole from the front, then go behind the wall. If the wood is sound, put wood glue in the hole, reseat the T-nut and pull it tight with a bolt or a threaded-rod installer, then let the glue dry. If the wood is torn up, abandon that hole and drill a new one nearby. Screw-in T-nuts with screw holes resist spinning far better than plain pronged ones.
Sources
- Steve Lage, IndoorClimbing.com, How to Install T-Nuts
- IndoorClimbing.com, Plywood vs OSB for Climbing Walls
- IndoorClimbing.com, Climbing Wall Texturing
- Moon Climbing, MoonBoard T-Nut Kit - Metric (product page, accessed Nov 2026)
- Moon Climbing, MoonBoard DIY Panels (product page, accessed Nov 2026)
- Jocelyn Crawford, Treeline Review, How to Build a Home Climbing Wall (2025)
- APA – The Engineered Wood Association, Plywood (grades and bond classifications)
- Wikipedia (German), Sperrholz: Multiplex and EN 636 classes